A Detailed Guide On How To Use A Record Player
There is something innately magical about vinyl records. This medium of music presents a unique blend of tactile, auditory, and emotional elements that are rarely found in today’s digital world. Whether you’ve inherited a vintage turntable or bought a new one as part of your journey into the world of vinyl, learning how to use a record player can open up a rich, warm world of sound you never knew existed.
We know there is a steep learning curve when it comes to learning how to use a record player so we tried to create a very in depth guide on “How To Use A Record Player” so it might serve as not just a tool to learn initially but also a reference on how to use a record player with troubleshooting the basics.
How To Use A Record Player
There are a lot of factors to consider when getting ready to learn to use your record player. How To Use A Record Player? Before starting you should understand the equipment, set up your equipment, and have a vinyl record you wish to play. When you have done those things: turn on your amp, gently slide the vinyl out of its dust jacket, hold the vinyl only by the edges, place the vinyl record on your turntable, start the turn table so that the record is spinning and then gently place your stylus on the vinyl.
While this brief guide offers a straightforward sequence of steps to get you started, there’s a lot more depth to the process that deserves exploration. We highly recommend delving into the more detailed guide for a comprehensive understanding. Not only will it quench your curiosity, but it’s also a reliable resource for any questions that might arise or troubleshooting needs you may encounter. Rest assured, this enriching journey into the world of vinyl will be worth every note.

Step 1: Understanding the Equipment
Before you get started, it’s essential to familiarize yourself with the main parts of a record player. Every record player, whether it’s a vintage turntable or a sleek modern machine, has several key components:
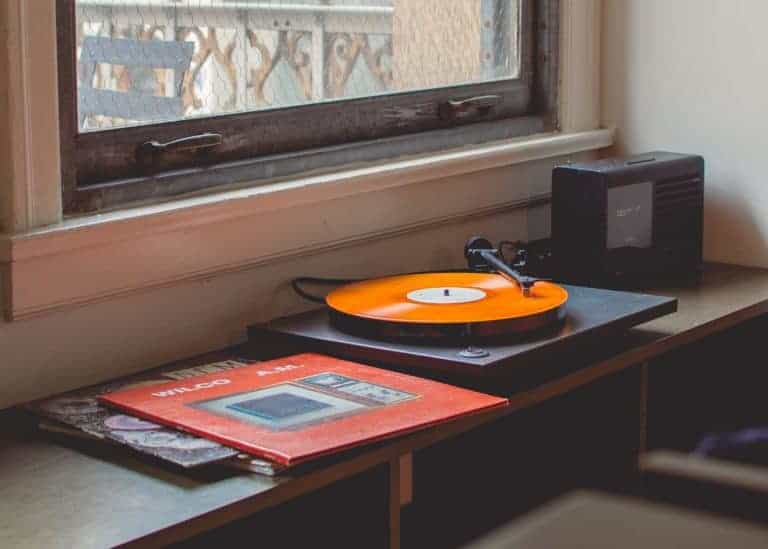
- The turntable, the heart of the player, is the main platform where the magic happens. It’s the part where the record spins at a constant speed, allowing the needle to trace its grooves and produce that rich, vinyl sound. This constant rotation is essential for a steady rhythm and pitch in the music.
- The platter is the round plate upon which your record sits. It begins to spin when the turntable is activated. Made from various materials such as metal, glass, or acrylic, its weight and balance can affect the overall sound quality and vibration control.
- The tonearm is the long arm that swings over the record. Its precision-engineered design is crucial in maintaining the stylus’s position in the record grooves. Incorrect alignment can affect the sound and potentially damage your records.
- The stylus, or more colloquially, the ‘needle’, is a tiny, sharp point usually made of diamond that reads the grooves on the record. As it traces these lines, it vibrates, and these movements are then converted into music. It’s one of the most delicate parts of the record player and requires careful handling.
- The cartridge is the device at the end of the tonearm housing the stylus. It takes the vibrations from the stylus, converts them into an electrical signal, and sends them on their way to the speakers to create the sound you hear.
- The counterweight, found at the back of the tonearm, helps to balance the tonearm and adjust the pressure applied by the stylus on the record. Properly setting the counterweight is important to ensure the stylus doesn’t press too hard or too lightly on the record.
- Lastly, there’s the speed selector. Records are cut at different speeds, and this switch adjusts the rotation speed of the turntable to match the record you’re playing. Usually, you can choose from 33 1/3, 45, or 78 RPM (revolutions per minute).
Step 2: Setting Up Your Record Player
The first step towards spinning your favorite vinyl is setting up your record player. The setup process may vary depending on your record player model, but there are some general steps that apply to most or all record players.
Begin by placing the record player on a flat, stable surface. Vibrations or uneven surfaces can cause skipping or other sound distortions. It’s best to find a dedicated spot where the player won’t be disturbed.
Once you have your turntable situated, it’s time to connect it to your speakers. Some record players have a built-in amplifier and can be connected directly to speakers, while others need to be connected to an external amplifier. In the latter case, ensure your amplifier is connected to your speakers and the output of your record player is connected to the amplifier.
Finally, plug in your record player.

Step 3: Preparing to Play
Next, choose the record you want to play. Records are not only differentiated by their size but also by the speed at which they should be played. This information can be found on the record’s label or dust jacket. Set your speed selector to the appropriate corresponding setting.
Now, you are ready to handle your vinyl. Remove the record from its sleeve carefully, being sure to hold it by the edges and the labeled part in the center to avoid touching the grooves. These grooves can be easily damaged by dust, oils, and scratches, which can greatly affect the sound quality. Once you’re holding your record properly, place it onto the platter, ensuring it’s seated firmly in the middle.
Step 4: Let the Music Play
Now comes the exciting part – playing the record. Lift the tonearm using the cueing lever, typically located near the base of the tonearm. This device ensures that the tonearm is raised and lowered smoothly, protecting the stylus and the record from damage.
Move the tonearm to the edge of the record, positioning the stylus above the outermost grooves of the vinyl. With a gentle touch, lower the cueing lever. This action will drop the stylus onto the record, and you’ll start to hear the music play. Now is the perfect time to adjust the volume on your speakers or amplifier to your comfortable listening level.
Step 5: After Playing
When the last notes have played out and the record has finished, it’s important not to forget the proper shut-down procedure. Lift the tonearm using the cueing lever and return the tonearm to its rest. Be sure to secure the tonearm lock to prevent accidental movement. This not only protects the stylus but also prevents unnecessary wear on the motor if your tonearm activates the motor like some older models or automatics.
Turn off the turntable and carefully remove the record. Return the record to its sleeve immediately to avoid dust and scratches. Always handle your records with care, as they are delicate and can be easily damaged.
How to Use a Record Player: A Summary
Now that we’ve detailed the components of a record player and provided a thorough walkthrough of its operation, here’s a quick summary for easy reference:
Familiarize Yourself with the Equipment:
Understand the purpose of the turntable, platter, tonearm, stylus, cartridge, counterweight, and speed selector.
Setting Up Your Record Player:
Place your record player on a flat, stable surface. Connect it to your speakers, and if necessary, to your amplifier.
Prepare to Play:
Choose your record and set the speed selector to match the record’s required playing speed. Remove the record from its sleeve, holding it by the edges and center label to avoid touching the grooves. Place it firmly onto the platter.
Playing the Record:
Lift the tonearm using the cueing lever and move it to the edge of the record. Lower the cueing lever to allow the stylus to contact the record, and adjust the volume as needed.
After Playing:
Once the record has finished, lift the tonearm using the cueing lever and return it to its resting place. Turn off the turntable, remove the record, and store it back in its sleeve.

How to Use a Record Player: A Step-by-Step Guide for Beginners
Embarking on your vinyl journey begins with handling your precious record with the utmost care. Let’s delve into the steps that you would take if you already have everything setup. This will give you a little more detail.
Step 1: Choose the Record
Start by gently extracting the record from its protective sleeve. It’s important to touch only the edges and label to prevent the transfer of natural oils from your fingertips onto the record grooves.
Step 2: Record Placement
Position the record on the turntable platter, ensuring the spindle aligns with the central hole of the record. Records typically have sides labeled A and B, and in the case of double LPs, you might see C and D as well.
Step 3: Speed Selection
Determine the correct speed for your record. Most 12-inch LPs spin at 33 1/3 RPM, while 7-inch singles typically play at 45 RPM. However, always check the central label for the accurate speed. If it’s not specified, it’s safe to assume 33 for an LP and 45 for a single. Your record player will usually have a switch on its base to adjust the speed.
If you start hearing the audio and it sounds like chipmunks then you chose a speed that is too high. If it makes your Taylor Swift album sound like she’s singing slow and low then you chose a speed that is too slow.
Step 4: Cue Lever Utilization
If your record player features a cue lever to manage the tonearm’s movement, it’s time to put it to good use. Avoid manually manipulating the tonearm as much as possible as it increases the risk of scratching your vinyl until you become more familiar with the process.

Step 5: Tonearm Positioning
With the cue lever in the raised position, gently swing the tonearm over the edge of your record. Visually align the stylus (or ‘needle’) so it’s just inside the disc. Avoid placing it too close to the edge as it might miss the run-in groove and slip off the side.

Step 6: Dropping the Stylus
As your record begins to spin, use the cue lever to gently lower the stylus onto the vinyl. Once it catches the groove, the beautiful sounds of music will fill your space.
Bravo! You’ve now mastered the process. It might seem intricate at first, but the hands-on experience adds to the joy of vinyl music. The tactile interaction with your records transforms listening to music into an engaging ritual that enhances your appreciation of the medium.
Can You Skip Songs on Vinyl?
The tactile nature of vinyl records might leave you wondering about the flexibility of song selection. While digital formats offer the ease of skipping from one track to another with a simple click, can you do the same with vinyl?
The answer is yes, you can skip songs on a vinyl record. With careful handling and a little practice, you can navigate the grooves of your record to select individual tracks. The process involves visually identifying the breaks between tracks and gently positioning the stylus over the track you wish to play. However, it’s important to remember that vinyl is a more delicate and physically engaging format than digital music.
Unlike with digital formats, skipping songs on vinyl requires a hands-on approach. There is a certain charm in this physical interaction, which gives a deeper connection to the music. It’s part of the vinyl experience, which is as much about the journey of handling the medium as it is about the destination of the music itself.
In the next section, we’ll provide a detailed guide on how to skip a track on a vinyl record because you are learning how to use a record player so you have to learn how to snap a track. This guide will help you become more comfortable with the process and allow you to enjoy your vinyl collection on your own terms. Remember, it’s all about the unique experience that vinyl has to offer.
Use a Record Player: How to Skip a Track on a Vinyl Record
While vinyl records offer a unique listening experience that is often best appreciated when played in sequence, there may be times when you want to skip to a specific song. This process requires a gentle hand and some careful observation.
Step 1: Lift the Stylus
Start by carefully lifting the tonearm using the cue lever. This action disengages the stylus (or ‘needle’) from the grooves of the spinning record, halting the playback.
Step 2: Scan the Record
Look at the surface of the record under good light. Vinyl records have a visual pattern; each track is separated by a slightly wider, smoother, and shinier space. These spaces are the breaks between songs.
Step 3: Align the Stylus
Using the cue lever, slowly and gently move the tonearm over the break that precedes the track you want to listen to. This requires a keen eye and a steady hand, as the breaks can be quite thin.
Step 4: Lower the Stylus
Once you believe the stylus is hovering above the desired track’s starting groove, carefully lower the cue lever. The stylus will drop into the groove and begin to play your selected track.
A word of caution: regularly skipping tracks might potentially cause slight wear to your records over time. Always handle the tonearm gently to minimize the impact on your vinyl collection. Alternatively if you have a cue lever you can slowly drop the stylus using the cue lever to avoid this as much as possible.
By following these steps, you can navigate your vinyl records with precision, jumping to your favorite tracks whenever the mood strikes. Remember, part of the vinyl experience is the tactile interaction with your music collection, enhancing your appreciation of the physical medium. Happy listening!
Remember to be patient with this process. Skipping tracks on vinyl is a bit more involved than pressing a button, but with practice, you’ll become adept at it.
How To Use A Record Player: Navigating the World of Automatic and Manual Record Players
Understanding the differences between automatic and manual record players is crucial to fully appreciating and enjoying your vinyl experience. Each type offers unique features, catering to various user preferences, and levels of engagement with the music.

How To Use Automatic Record Players
Automatic record players are designed for ease of use and convenience. These turntables perform many functions at the push of a button, which makes them easier for those new to the world of vinyl or anyone seeking a hands-off listening experience but they are not ideal.
Here’s how you would typically use an automatic record player:
1. Place your record on the platter and set the speed according to the record’s requirements.
2. Select the size of the record, usually by a switch labeled as ’12’ for 12-inch records and ‘7’ for 7-inch records.
3. Press the ‘start’ button. The turntable will automatically start spinning, and the tonearm will lift, move to the beginning of the record, and lower the stylus onto the record.
4. When the record finishes playing, the tonearm will automatically lift, return to its resting place, and the turntable will stop spinning.
It’s as simple as that. Automatic turntables minimize the risk of damaging your records through mishandling, making them a great choice for beginners or those with valuable vinyl collections, but we don’t consider them ideal.
How To Use Manual Record Players
Manual record players, on the other hand, allow a deeper engagement with your music. As the name implies, these turntables require manual operation for most of their functions, giving you total control over your listening experience.

Here’s a step-by-step guide on how to use a manual record player:
1. Place your record on the platter, ensuring that the center hole aligns with the spindle.
2. Set the speed according to the record’s requirements.
3. Lift the tonearm using the cueing lever, move it over to the edge of the record, ensuring the stylus is positioned just above the outermost grooves of the vinyl.
4. With a gentle touch, lower the cueing lever to drop the stylus onto the record and start the music.
5. When the record finishes, you must manually lift the tonearm, return it to its resting place, and stop the turntable.
While manual record players require more involvement, many vinyl enthusiasts swear by the intimacy of this hands-on interaction. It’s all part of the immersive, tactile experience that vinyl records offer.
Whether you prefer the convenience of an automatic record player or the tactile interaction of a manual turntable, the most important thing is to enjoy the journey into the warm, vibrant world of vinyl music. Each record, each play, brings a unique experience, allowing you to connect with music in a way that’s both personal and profound.
How To Use A Record Player: Using a Record Player with Built-in Speakers
Record players with built-in speakers offer a perfect blend of convenience and functionality. These self-contained units are excellent for those who want a simple, plug-and-play solution to enjoy their vinyl collection.
Whether you’re new to the world of vinyl or looking to simplify your setup, a turntable with built-in speakers can make your vinyl listening experience a breeze. These are commonly called suitcase record players. They are not ideal for long term record listening or hobby but for a beginner getting start they at least offer you the opportunity to learn the basics.
Record players with built-in speakers offer an easy, all-in-one solution to enjoy vinyl. Here’s how to use one:
Step 1: Place your record player on a flat, stable surface away from vibration-causing devices.
Step 2: Plug your record player into a power outlet and turn it on.
Step 3: Choose your vinyl record, handle it by the edges, and place it on the platter.
Step 4: Adjust the turntable’s speed to match the record (typically 33 1/3, 45, or 78 RPM).
Step 5: Lift the tonearm using the cueing lever, position it over the record’s edge, and gently lower it. Your record will start playing through the built-in speakers.
Step 6: Use the controls on your record player to adjust volume and, if available, tweak tone or equalizer settings.
Step 7: When the music ends, lift the tonearm back to its resting place, and return the record to its sleeve.
With these simple steps, your record player with built-in speakers is all set to deliver the warmth of vinyl right to your space.

Short Troubleshooting Guide for Beginners
Congratulations on joining the vibrant world of vinyl enthusiasts! You are learning how to use a record player like a pro! As you venture into this rich musical journey, it’s natural to encounter a few hiccups along the way. Here’s a simple troubleshooting guide to help you resolve some common issues you might encounter:
Issue 1: No Sound or Distorted Sound
If you’re not getting any sound, or the sound is distorted, here are some things to check:
- Your Setup: Ensure that all cables are properly connected. Your turntable should be connected to your speakers or amplifier, and both should be powered on. If you’re using an external preamp, ensure it’s correctly hooked up.
- Volume and Source Settings: Check the volume levels on your amplifier or speakers. Also, ensure you’ve selected the correct source (usually marked as ‘Phono’ or ‘Aux’, depending on your setup).
- Speed Setting: If you start hearing the audio and it sounds like chipmunks then you chose a speed that is too high. If it makes your Taylor Swift album sound like she’s singing slow and low then you chose a speed that is too slow.
- Stylus and Cartridge: A worn-out stylus can lead to a distorted sound. If the stylus is visibly worn or bent, it might be time to replace it.
Issue 2: Skipping or Jumping
More in-depth read on this topic can be found in this article called ‘Why is my record skipping?‘
If the record player is skipping or jumping, try these solutions:
- Record Condition: Examine your record for dust, scratches, or warps. A damaged or dirty record can cause the stylus to skip. We recommend a good cleaning.
- Stylus Pressure: The pressure applied by the stylus on the record might be too light, causing it to jump. You can adjust this using the counterweight at the back of the tonearm.
- Turntable Level: Ensure your turntable is placed on a flat and stable surface. An uneven surface or excessive vibrations can cause skipping.
Issue 3: Speed Issues
If your records are playing too fast or too slow:
- Speed Settings: Double-check that you’ve set the speed selector switch to the right setting for your record (33 1/3, 45, or 78 RPM).
- Belt Condition (for belt-driven turntables): If the speed continues to be inconsistent, the drive belt could be worn out or may have lost its elasticity and need replacing.
Remember, patience and care are crucial when handling vinyl, record players, especially when you are learning how to use a record player. Each model has its unique quirks, so the more you use your turntable, the more familiar you’ll become with its operation. If you’re unable to resolve an issue, it might be best to consult the user manual or contact the manufacturer’s customer service.
Exploring the world of vinyl and learning how to use a record player can be a deeply rewarding journey. While there may be occasional challenges, overcoming them is part of the analog experience that makes vinyl so special.
As you drop the needle on your first vinyl record, you’re not just playing music – you’re experiencing the rich tones and warm hues of sound that vinyl has to offer. Using a record player might seem intimidating initially when you aren’t sure how to use a record player, but with these steps, you’ll be navigating your vinyl collection like a pro.
There’s a particular charm to playing music on vinyl – a blend of nostalgia and an appreciation for the tangible aspect of music. So, sit back, relax, and let the analog warmth of the vinyl take you on a journey through the annals of music. There is an entire world of music waiting for you to explore, one side at a time. Enjoy the ride, and happy listening!